Converting a Meade ETX-90RA into a full Goto telescope
- Azimuth axis modifications
- Altitude axis and fork
- Putting it all together
- Results
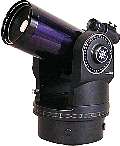
I’ve always liked the Meade ETX series of telescopes but could never justify buying one. A few years ago Astronomics had the ETX-90RA (pictured at right) on sale for $150; at that price, I just had to pick one up. The ETX-90RA is the original version of the ETX, and has a single RA drive motor. Dec motion is via a fine control knob, or by hand.
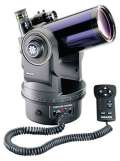
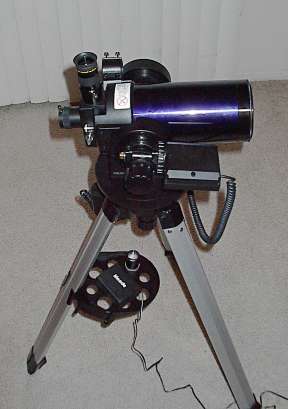
I’d already read the ETX-90RA comments on Mike Weasner’s site and was well aware of the telescope’s limitations. After using the telescope for a few weeks, I decided to convert it to a goto telescope, like its big brother, the ETX-90EC (pictured below left).
Mike Weasner’s site again came up with the inspiration. In the TechTips section Ralph Encarnacion wrote in with how he mounted his ETX-90RA onto a modified Meade DS-70 telescope mount. By adding a Meade 497 Autostar, he had the equivalent of an ETX-90EC!
Just about any DS or low-end ETX telescope should make a suitable motor and mount donor. You can even buy the DS motor package from Meade and add it to your own mount.
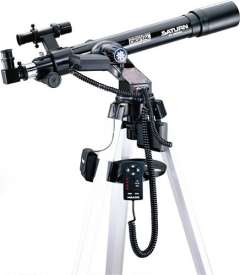
During my research into which telescope to buy as a parts donor, I discovered that Amazon was selling the Meade Saturn DS60EC 60mm refractor for $99.
The DS-60EC uses sub-sized 0.967″ eyepieces, and is generally not a great scope, but it does come with the DS motors and an electronic handpad. It has an all aluminum alt-az mount that attaches to the tripod legs.
After unpacking and assembling the DS-60, I gave it a quick checkout, looked through it at a distant building…then proceeded to strip it down.
I thought about making a quick conversion (like Ralph’s) by adding an aluminum bracket and attaching the ETX OTA to the altitude forks, but I didn’t want to give up the original ETX mount. After some examination of the parts and some thinking time, I had a plan on how to adapt the DS motors onto the ETX-RA’s mount.
First, I stripped the DS-60. I removed the refractor’s tube from its plastic altitude holders, then removed the holders from the altitude fork arms. One holder was easy to remove. The other (on the “West” fork, if this were an equatorial mount), which includes the altitude drive bolt, was much harder to remove. I eventually managed to get the bolt unscrewed from the nut in the plastic holder; it had been glued to the nut using something like Locktite.
Next, I removed the azimuth drive bolt from the fork base. This bolt also had some glue on the threads, but it was relatively easy to unbolt.
The ETX-90RA was disassembled as well. I removed the OTA and set it aside. I took the base apart completely,
including the fork arms. The “East” fork was left untouched and set aside. The “West” fork, which has the Alt/Dec
clutch and fine motion screw and arm, was completely disassembled
Azimuth axis
After the ETX disassembly, I started modifying the DS-60 altitude fork assembly. This is a cast aluminum box, with an opening for the electronics interface plate and two aluminum fork arms. Using a bandsaw, I cut off the fork arms, leaving the box and two triangular aluminum wedges where the fork arms used to be. The odd shape made it difficult (and dangerous!) to cut these wedges off with the bandsaw, so I hacked them off with a hacksaw. Since this top section would be the azimuth attachment point for the ETX, I tried to make it as flat as possible. A belt sander removed the last bits of excess aluminum and other surface imperfections from the azimuth box. I placed and centered the top of the ETX base on the azimuth box and drilled and tapped four screw holes in the azimuth box. A quick test showed that all was well centered and flat. I set this assembly aside and moved on to the West drive fork.
Altitude axis and fork

The West fork has a central hole that was just big enough for the DS-60 altitude bolt, but there just wasn’t enough clearance for the DS-60 gear head and motor assembly. I thought about using standoff posts to mount the gear head, but this would have been far too flimsy. Instead, I went back to the DS-60 altitude fork. It had the right mounting holes and was thick enough to allow the altitude gear head assembly to clear the fork. he only option was to cut off the very top of the azimuth fork and use that as a spacer. I didn’t like the thought of yet more band-saw work, but the cutting went very quickly.
A few passes on the belt sander, and I had a roughly circular spacer with the proper mounting holes for the gear head.
I centered the aluminum spacer over the axle hole in the fork arm and drilled through the gear head mounting holes with a drill bit small enough to miss the 4-40 threads. I enlarged the holes from the backside and tapped them to fit 4-40 screws. I then countersunk the holes in the plastic fork arm from the inward-facing surface and attached the aluminum spacer. Countersinking the screws keeps them from dragging against the surface of the altitude axis.
The next problem was the arm that connects the ETX OTA to the altitude axis. The part has a short plastic cylinder that acts as the axle and a short arm that holds the ETX tube. The surface of the cylinder that touches the altitude fork is inset a few millimeters resulting in a plastic ring a few millimeters high. The center of the cylinder has a brass insert that used to hold the alt axis setting circle. I drilled this out.
The DS-60 axle bolt has threads for the clutch and gear, so the bolt positioning is critical. I had to figure out a way of mounting this bolt securely.
I noticed that the circular part of the original DS-60 refractor tube mount (with its receptacle for the nut that holds the axle bolt) fit almost perfectly into the insert on the altitude axis.
Using a hacksaw, I cut off the round plastic section and sanded it until it fit flush and centered in the altitude cylinder and epoxied it in place.
Putting it all together
With both the altitude and azimuth axes modified, I started to put the telescope together. The azimuth axis was first. I reassembled the ETX fork arms, attached the stiffener disk to the base and attached the base to the aluminum azimuth box. The base could now swing freely on the azimuth axle bolt. I attached the azimuth gear head and right away noticed that the metal axle bolt was rubbing against the plastic of the gear head mount. I don’t know if this is intentional (a form of Meade friction clutch?) but I wasn’t going to put up with it. Using some sandpaper, I enlarged the hole in the gear head until the bolt could go through without touching. I wonder if this friction fit is causing the excess current drain seen in some Meade DS systems.
Once the gear, washers and clutch knob were installed, I hooked up the azimuth motor, power supply and handpad and tested the azimuth axis. It worked!
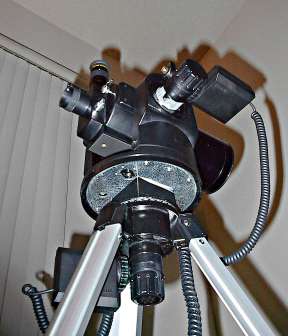
The picture to the right shows the ETX base stiffener, aluminum base and both the altitude and azimuth motors and gear heads. The altitude spacer (cut from the DS-60 fork arm) is visible as well. I’ll eventually paint it black.
The altitude gear head had the same problem as the azimuth gear head. After some sanding, it too rotated freely. I attached the gear head and motor and tested the two axes. They both worked. I then put the ETX OTA back in its place, tightened the clutches and moved the telescope around with the handheld controller.
Checking my watch, I realized that I had just enough time to walk to the local camera store (a Meade dealer) and buy a 497 Autostar. Later that night, I connected the Autostar, trained the motors and aligned the telescope. I looked at a couple of stars before the clouds stared to roll in. As it always happens, it rained for the next three days, but on the first clear night, I got to spend some quality time slewing around the sky.


Here are some pictures of the completed telescope:
Results
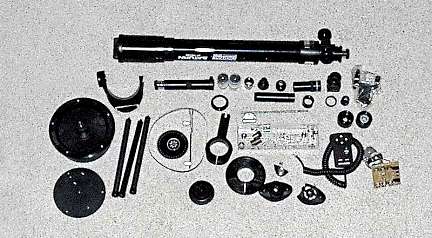
The picture below shows all the leftover parts from this project.
I grew tired of the ETX finder scope pretty quickly. In the pile of leftover parts, I noticed the DS-60 right angle adapter. I took the ETX finder apart and glued its objective to one end of the right angle adapter. I put in a low power eyepiece from the DS-60 in the other end and presto! A new right angle finder. I had to enlarge the finder holder on the ETX slightly, but it works.
This was a quick project. It only took a couple of nights of leisurely work, and the resulting telescope is a big improvement over both the original ETX-90RA and DS-60EC. The overall project cost under $500 (including taxes, shipping and the Scopetronix eyepiece adapter for the rear Cassegrain focus). A little less than buying an ETX-90EC outright (and a lot more work), but I really enjoyed the project, and that’s what matters.
Using the telescope, I’ve noticed that there’s some slop in both axes. I don’t think this is due to the Frankenstein nature of this telescope, but due to the way Meade has implemented their clutch system. The gear for each axis is free floating, held in place between two keyed but loose washers. You can push the washers (and gear) together by tightening the clutch, but this will always allow some slippage of the gear. Meade had a reason for this, especially in the DS-60; slewing too far in certain directions would cause the telescope’s OTA to hit the base of the telescope, and could cause the motors to burn out, damage the gears or both.
My next change will probably be to lock the gear in place with two nuts and some Locktite. I’ll add limit switches to the Dec axis to cut off power to the Dec motor if the limit switch is hit.
The apparently flimsy tripod from the DS-60 is surprisingly good. It could use some sort of stiffening in the legs, but so far, I haven’t had any problems with it.
Frank Henriquez, November 16, 2002
Some links of interest:
Steve Bedair’s DS Powered Telescope Mounts
Hans Peter Wallner’s Computer Controlled Telescope Mounts
Mike Weasner’s ETX site
Updated August 5, 2020